How to Configure the Wish To Go Travel Plugin
Configuring the Wish To Go plugin is very easy. Just follow this step by step guide to master the setup of the widgets contained in the plugin. If you are using WordPress, please go the WishWidget WordPress Configuration section. In case you are using any other CMS or web page development platform, please read the section Generic WishWidget Configuration.
WishWidget WordPress Configuration
The WishWidget is the heart (
Prepare the WordPress Post Editor
In order to easily configure Wish To Go you have to set your WordPress copy to show the Custom fields at the bottom of the post editor. You only need to do this step once.
Open your post editor in the WordPress dashboard.
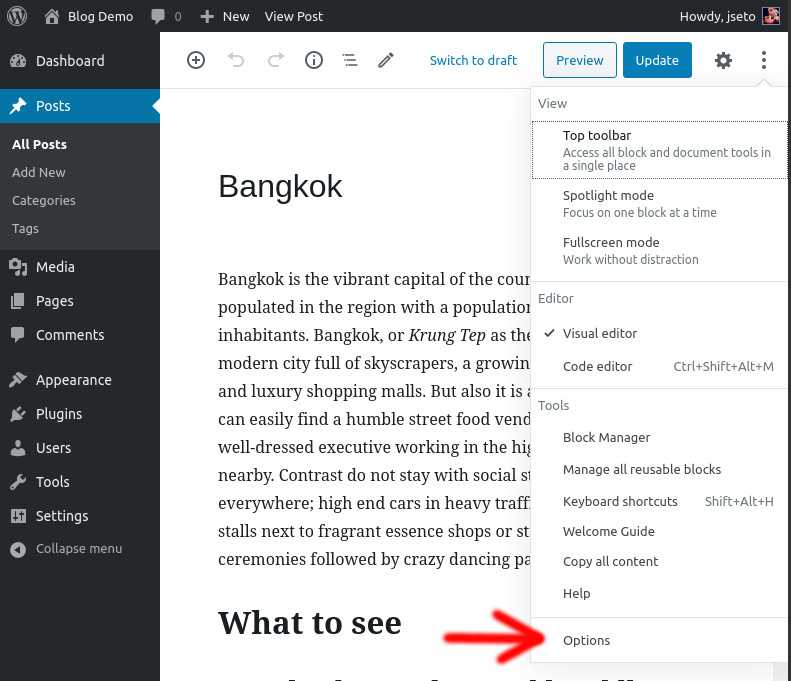
Look for the 3 vertical dots at the top-right corner to open the post editor More tools and options panel. Click on the Options menu item.

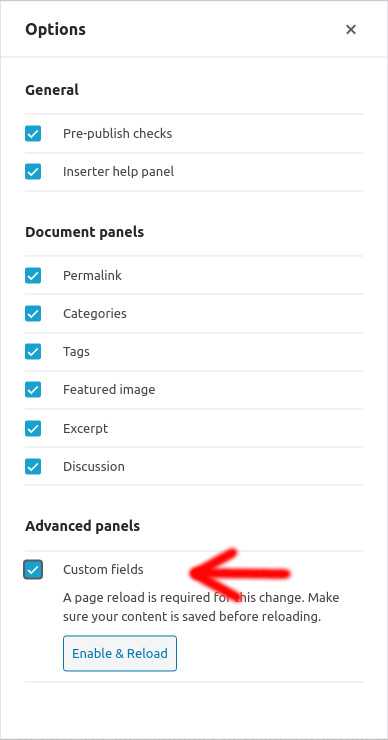
- In the Options panel, check the Custom fields option and click on the Enable and Reload button.

Configuring the WishWidget in the Post Title
Open your post editor in the WordPress dashboard. Select the post where you want the WishWidget heart to appear and write a title if it is a new post.
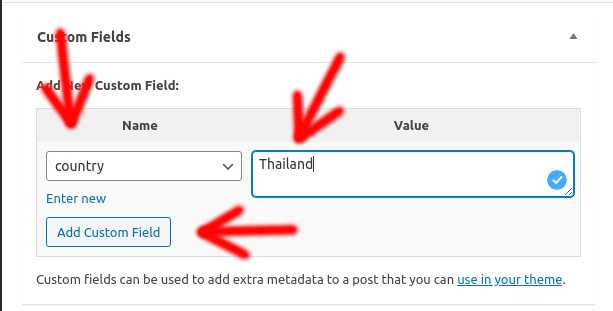
Go to the bottom of the editor and find the Custom Fields panel.
Select Country from the Name dropdown menu and write the country name or country code in the Value field. Click on the Add Custom Field button.

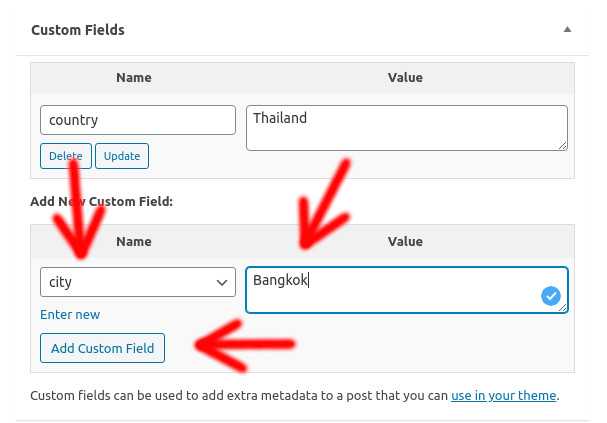
- If your post is about a country, you are finished. If your post is about a city you should select the City custom field from the Name dropdown menu and set the name of the city in the Value field. Don't forget to click on the Add Custom Field buttom.

If your post is about an activity or a tour, repeat the process but select the Activity custom field from the Name dropdown menu and enter the name of the activity in the Value field. Click on the Add Custom Field button.
Click on the Preview button and check that the WishWidget heart appears next to the post title. Congratulations, you got it!
If you got stuck in some step, please feel free to send a message to the support team. We will be happy to help you.
It is important to be accurate and consistent with the country, city and activity names. If you are not consistent, your readers will see in the Travel Planner different names for the same destination degrading the user experience.
Configuring the WishWidget in the post body
You can insert the WishWidget heart in any part of your post text by using shortcodes. Wish To Go exposes a shortcode named wishwidget that you use to insert the WishWidget
Open your post editor in the WordPress dashboard. Select the post where you want the WishWidget heart to appear.
Write a subtitle for the post. We will use an entry for the Gran Palace in Bangkok. You can choose any other place.
Write a small text about the Gran Palace or any other attraction that you want. You can copy and paste the following text in your WordPress copy.
The Grand Palace of Bangkok is one of the most visited places in Thailand, and one of the best things to see and do in Bangkok. This architectural complex was the residence of kings from 1782 to 1925. The large number of visitors who tour the palace day after day can be somewhat overwhelming, but it is a must for any traveller passing through Bangkok.
The imposing complex is protected by the Chao Phraya River, the backbone of the city. A wall almost two metres high separates the palace from the rest of Bangkok. Next to the wall there is a defensive channel that transforms the enclosure into a kind of island called Rattana Kosin.
Go back to the subtitle and write the following shortcode at the end of the subtitle text:
[wishwidget country="TH" city="Bangkok" activity="Grand Palace"]Click the Preview button and check that the WishWidget heart is shown next to the subtitle. You should see something like this:
Grand Palace and Emerald Buddha
Now we will insert the WishWidget shortcode in the middle of a paragraph. Locate the words Chao Phraya River and write next to it the following code:
[wishwidget country="TH" city="Bangkok" activity="Chao Phraya River"]Click on the Preview button and look for the paragraph that we just edited. You will see something like this:
The imposing complex is protected by the Chao Phraya River
, the backbone of the city. A wall almost two metres high separates the palace from the rest of Bangkok. Next to the wall there is a defensive channel that transforms the enclosure into a kind of island called Rattana Kosin. Congratulations! You did it. Now you have a country, a city and two activities that your readers can bookmark and add to the Travel Planner.
If you are not able to configure the WishWidget, please do not hesitate to send a message to the support team.